“I just need one more deal to hit my quarterly bonus.”
This is what my friend told me, he is a full time insurance agent.
I’m sure this is something a sales person – especially life insurance agents – can relate to. You’re chasing sales targets, appointments, a payout bonus every day.
Most agents will spend extra time on cold calling to generate more leads and secure more appointments when they need to hit their sales targets.
But I know that this isn’t sustainable, because it is a very demotivating task and annoying for most people too.

“Here is the money to fund your experiment. I don’t expect much from this online marketing stuff. It’s a bonus for me if I get any appointments or close any deals”.
My friend gave me the money to try out things that I wasn’t that confident with at that time.
Other friends who are in the insurance industry are asking us: “Is there a way to scale up what I am doing without spending more time? I don’t have a lot of money to spend on this as well.”
Also, some insurance agencies have realised that recruiting people to join the team isn’t the hardest part of their career, helping the new team member to survive when they are just getting started is another tough challenge.
Insurance Marketing, is it hard? Let me share the results I manage to generate
Last month, I managed to generate 41 leads in just 16 days, and the appointment rate is up to 90% after qualifying / filtering our leads.
I actually paused the ads for a few days as our server wasn’t stable and the website wasn’t loading properly due to technical issues.

Sure, my friend managed to close a few deals from the leads I generated in just a few days. Some of the deals took some time to confirm and collect the payment, some were confirmed in a very short time.
Our results mainly come from social media, because nobody wakes up one morning then realises that they need to buy insurance. Social media is a good channel for me to show what people don’t realise they need it, and generate demand.
Client wishlist
There are thousands of insurance agents out there. Most people are not short of choice when it come to buying their insurance.
Insurance isn’t just a pack of nasi lemak, where in the worst case you will lose just RM2 if it tastes bad. The risk of choosing the wrong insurance agent or insurance plan is extremely high and complicated to understand. You don’t realise you’ve made the wrong choice until you lose your money.
Newspapers and internet aren’t short of stories of insurance agents overselling their plans, or keeping the money without purchasing the coverage for those who paid for the insurance.

There are 3 things they have in their mind when it comes to insurance:
- Someone I can “click” with (like)
- A person that understands me the most
- Someone that serves me the best
You must fulfill all 3 criteria before they will buy. That is why most insurance agents start their career by selling insurance to friends and family first. You already pass all 3 criteria they are looking for.
But when it comes to cold markets, you’re starting from zero.
I believe most agents do not have a problem clicking with people as long as they remain friendly and smile all the time.
Our strategy here involves narrowing down to a specific pond (niche, problem or specific group of people) so when we appear on their Facebook, it seems like we understand them and we are the ones who can serve them the best.
In this case study, I will use divorced women as an example to walk you through how I prepared the marketing campaign.
Please take note: Your insurance company might have a different policy when it come to marketing. Do check with your headquarters or regional office regarding the policy.
In our marketing material, we never display any insurance company brand name, logo, policy publicly.
Step 1: Identify your ideal buyer persona
This step is a crucial step to kick start your marketing campaign online. If you skip this step and start to build your website and ads directly, your will fail miserably.
One common mistake insurance agents make is that they try to target and reach everyone. When you say everyone, that means NOBODY.
Moreover, all the Facebook algorithms and analytics software aren’t able to help you much if you don’t even know who you want to reach. If you’re confused about who you want to reach, do you think Facebook’s algorithm knows?

Here is some of the info you need to write down:
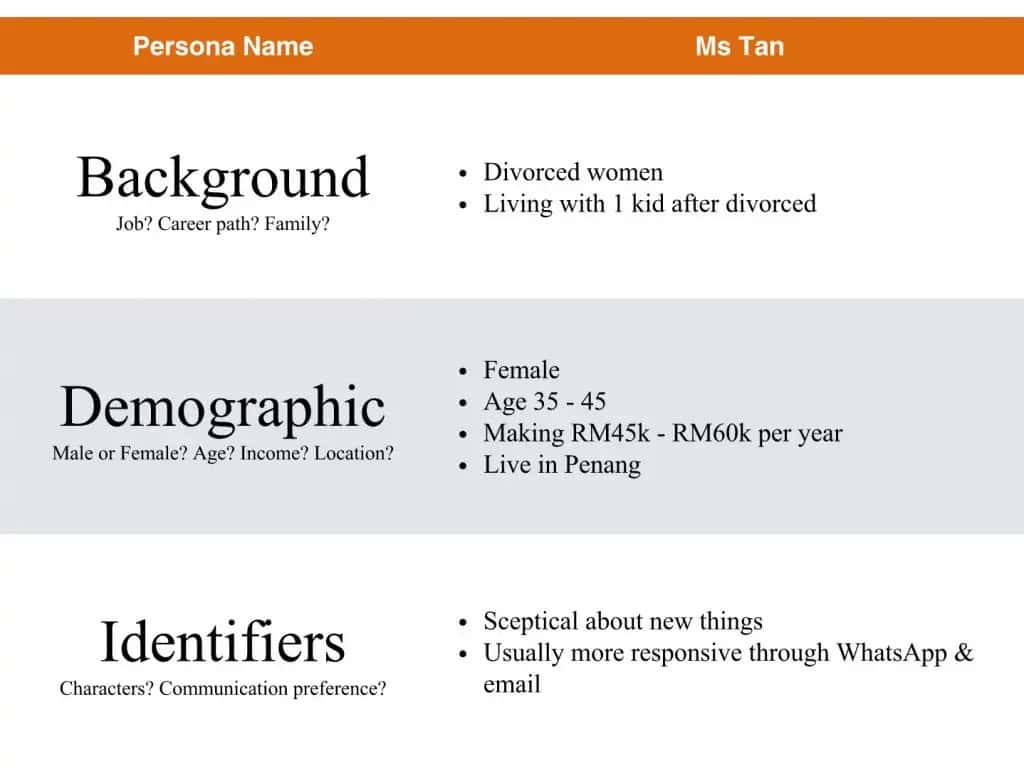
- Background (job? career path? family?)
- Demographic (male or female? age? income? location?)
- Identifiers (characters? communication preference?)
- Goal (primary and secondary goal)
- Challenges (primary and secondary challenges)
- What we can do to help our persona achieve their goals? to help our persona overcome their challenges?
- Real quotes (what they say about their challenges and goals)
- Common objections (why aren’t they buying insurance from you?
- Marketing message (how do you position the insurance plan you want to sell?)
- Elevator pitch (how do you pitch / describe your insurance plan in just 1 line?)
We have put together all these slides into a powerpoint files so that you can fill them in accordingly. Take some time to brainstorm the market you want to reach, put yourself into their shoes and think like them.
Tips 2: Your message should resonate with them emotionally, not just logically. People buy based on emotion, not just the numbers you’re showing them.
For example, if you’re a guy, then you don’t want to target pregnant women and sell them your insurance plan. They will never believe you when you say how much you understand their pain when delivering a baby.
It is so much harder to click with them.
Here is an example of buyer persona I put together.


Step 2: Craft your offer or solution
Once you know who you want to target, then you will need to think how you can help them.
Remember, you aren’t selling an insurance policy, you are selling a solution to their problems.
When you create the offer / solution to their problems, make sure you pinpoint the problem they can FEEL. If you’re trying to use numbers and logic to convince them, your campaign will generate very few results.
Here is what I mean.
Insurance agents love to show the amount the policy can payout. But buyers will have a hard time imagining whether the amount you proposed is enough, and they don’t even know what the money can do.
What you need to offer is to show them how they can use the money to make sure their kid can continue to live a happy life even without their mom around.
Focus on the problem, solution and how they feel. Numbers are less important at the beginning until they know how to use the money.
The last part of the buyer persona will help you to position yourself appropriately. You want to know exactly how you will talk to them.

Step 3: Build a landing page and set up tracking software
There are many drag and drop editors available on the market to help you build a simple website quickly without any coding experience.
You need to invest a minimum amount to setup the page. Do not go for free stuff like WordPress.com, blogspot, or free Wix websites.
Once people see it is a free solution or spammy domain name, they will just leave without submitting their info because they have a serious concern about their personal data.
You shouldn’t build a simple page / form using Google forms either because you won’t be able to install tracking software in the next step.
I won’t go through the step by step of how to setup a website here since this is an entirely different topic. I will focus on strategy and things that make a landing page work.
Your website and online marketing process should look like this:

A good landing page should feature a few key things:
- Well written headline with a clear offering
- Simple form for people to fill in
- NO link back to Facebook to like your page, or PM you
- A thank you page to let visitors know what to expect next
- Tracking code from Google and Facebook ads
A simple landing page should look like this:
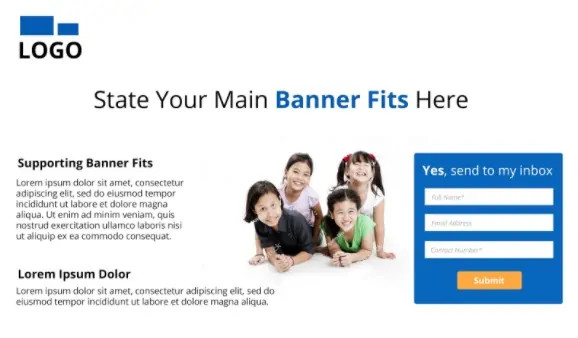
This works best because you’re telling people exactly what they can expect to hear after they give you their info.
You will need a ‘thank you’ page to allow the system to redirect those who fill in a form.
This page has 3 functions:
- Let the visitor know that you have received their request.
- Set a right expectation. Let the visitor know that how soon you can respond to them. For example, the resource should appear in their inbox in the next 5 minutes. If it is a call back request, then state number of hours they can expect a call from your agent.
- Act as a page to feed the data back to Facebook, and tag this person as converted lead. This data will then use to optimize your ads for more conversion / more leads.
You don’t need a fancy page, just a simple message telling them when you will get back to them, and what to expect next.
Before you get excited and start with your Facebook ads creative, you need to setup the Facebook pixel. This is the key to achieving consistent results, and knowing exactly which ad / campaign is working.
Create a Facebook pixel
Go to pixel tab in your Facebook ads account. You must first click on the burger menu icon, and then find “Pixel”.

Click create pixel, and follow the pop up box to complete your pixel setup. If you have already set up the pixel on the website, you can skip this step.

Install it on your website / landing page
One of the steps requires you to install the pixel on the website. This simply means you copy and paste the code on the page and make sure it fires up.
If you follow the step by step guide when you create the Facebook pixel, you should recieve the instructions on how to install it.
Facebook provides some extra guidance for various platforms in their documentation as well.
Read more on Get started with Facebook pixel
Make sure the pixel fires up correctly at the front end by using Google Chrome after you install it on your website.
You can go to your Google Chrome extension manager and search for Facebook pixel Helper, or click this link to bring you directly to the page in your Google chrome.
Click on the extension for Facebook, and install the extension in your Google Chrome browser.

When you visit a page that has Facebook pixel fired up properly, the extension will show you the details on what it is tracking.
If you visit WebHero’s page with this extension activated, you can see that the pixel is fired up.

Create a custom conversion in Facebook
Go to custom conversion in your Facebook ads manager, select custom conversion to setup or tell Facebook what a conversion means for you.

In our case, once a visitor fills in a form, and it redirects to another page, this is considered a lead for us. We want more similar people to click our ads and become a lead too.
Once you load the custom conversion page, it should allow you to create a new custom conversion. Click on create custom conversion, and there are 2 things you need to fill in.

For URL section, I will change to URL equal option, and then paste the thank you page URL into the field. Then I will change the category to lead.
Click next to continue creating the custom conversion.
Step 4: Setup your Facebook ads
Go to Ads manager, click create campaign to start creating your Facebook ads. If you get prompted to enter your credit card information to start advertising on Facebook, just follow the steps it provides.
First it will ask you to select an objective. If you have already followed the steps I’ve provided here, you should go for conversion.
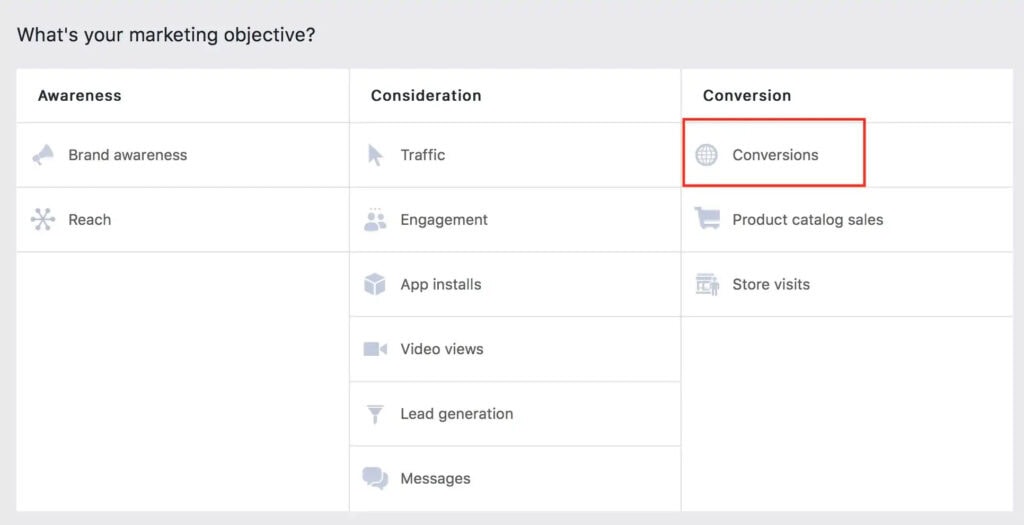
This will allow you to choose which custom conversion you use to optimize your campaign.
You will get cheaper clicks if you’re using other objectives like brand awareness, traffic or engagement. But running a facebook ads campaign isn’t a race to cheaper clicks, it is a race to see who can generate the leads at a consistent basis and low cost per lead.

For the campaign name, it doesn’t matter what you fill in. It is only available for advertisers to see, and this name will be used in the billing details. Your audience will not have any idea what you fill in here.
Simply fill in something that you can easily identify later. For example, for a campaign that targets divorced women, I will name it “Divorced women conversion campaign”.
In the custom conversion, it will allow you to select the custom conversion that you created in the previous step. Click next to set up a new Facebook ad set.

The following steps require you to refer to the work you have done in step 1. If you are trying to target everyone, then basically this step will burn budget and not get the results you want.
Select according to your buyer persona, which means you’re telling facebook that you want to reach a specific group of people, and these are the people very likely to convert.
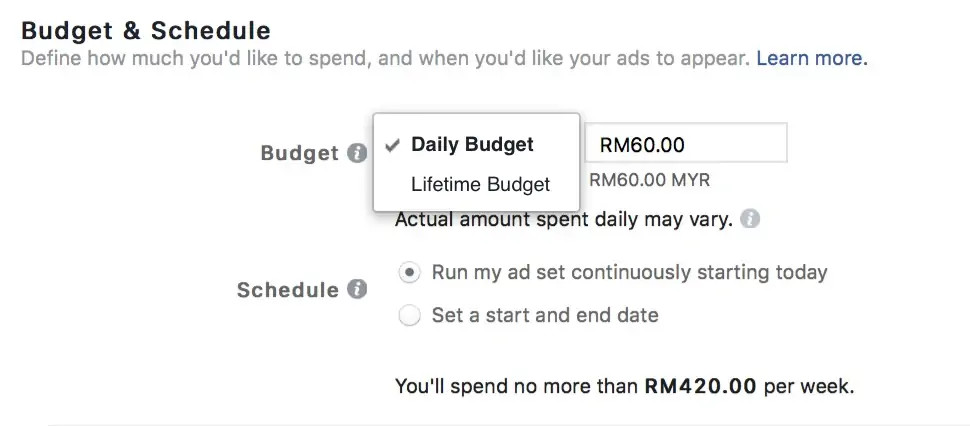
When it come to budget and schedule, usually I will start with a minimum daily budget. I will increase the budget if I see results after 24 – 36 hours.
I rarely use lifetime budget unless I need to schedule an end date, or run the ads at specific times throughout the day or week.
I like to have a little more overt control over how I spend the budget. A daily budget is just the tool to give me that kind of control.
For lifetime budget, if you schedule at RM100 for 10 days, it might just eat up your budget in 1 day. That way, Facebook has already burned all my money before I can tweak and optimize my ads.

In the conversion setting, I will leave it as default. I will not enable the “optimized for clicks” to collect data first unless I find that my ads don’t deliver to as many people as I expect.
You can set a bid cap here if you’re worried that the cost per lead is way too high. Facebook still has quite good in bidding in your favor, therefore it’s best to leave that to Facebook.

The next step will be creating your facebook ads. There are many types of ad you can use, but for a total beginner I would suggest you to start with a single image ad first.
This is the easiest to get started with without much investment of time or money to create complicated ads.

The recommended image size is 1,200 x 628 pixels or image ratio is 1.91:1. When you’re using image ads, make sure you use an image that contains little (less than 20% of the area) or no overlaid text.
There are free stock photos provided by Facebook from shutterstock you can use in your ads. It isn’t the best way to create your ads, but if your design skills and time are limited, then this can be a good alternative.
You also want to select an image that ‘pops’ or stands out from the rest of the photos you will see on Facebook. People react to high contrast photos because they catch people’s attention while they scroll through the feed.
I write my Facebook ads in a very specific format using the perfect facebook ads template from Nicholas Kusmich. I tweak it to fit into what my friend can offer, and always test with different images and ads copy.
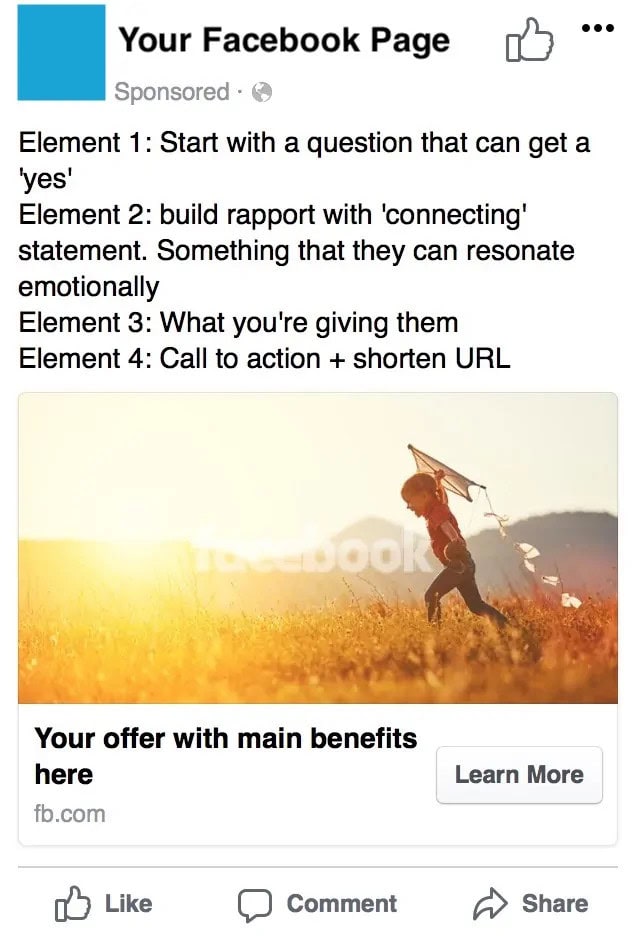
Step 5: Tweak your Facebook ads, landing page, and even target market
After you let your ads run for 24 hours – 36 hours, you need to check how your campaign is doing.
Don’t get confused by all the data Facebook is showing you, like the number of people in your ads result rate, the amount you spend, relevancy score and etc. You want to focus on the numbers that matters first: Number of leads generated and cost per lead.
If the cost exceeds your target, or simply does not generate results, kill the ads. Pause and change it.
Usually I start from the demographic data if my target group aren’t gender sensitive and the campaign is generating results.
You can sell insurance to everyone, but one of the genders might react better towards what you’re offering.
One of the campaigns that I run is skewed towards men of a specific age after running some time.
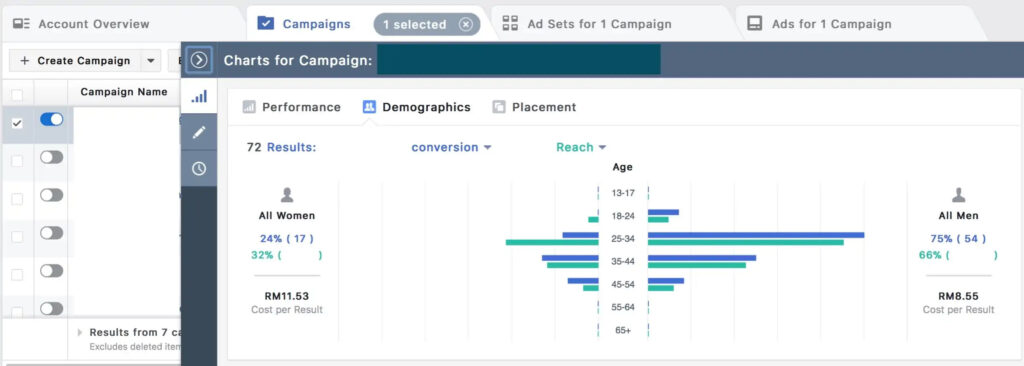
So all I did was to tweak the targeting in the ad set to reach more men instead of women, and give Facebook a much more specific target group that I want to reach.

As a result next day, I manage to cut the cost per lead up to 50% and generate more leads with the same amount of spending.
Gender is just one of the many demographics you can tweak to further optimize the Facebook campaign. Another important factor can be age. For example, you can’t expect to get a lot of leads from 20 year old divorced women, right?
You want to narrow down to a very specific age range, gender, place they live, interest etc to generate better results.
Once you find a winning campaign that generates you leads consistently over some days, you can consider scaling up the campaign by allocating more budget.

Simply go to your campaign ad set screen, check if your ads are generating the results you want. For example, you can see that the first ad I’m running has generated 32 leads at RM4.28/leads, hence I want more leads to come in at this cost.
Click the pencil icon when your mouse hovers over the budget, and increase the budget to a higher amount. Facebook will spend according to what you allocate here.
For other ads that don’t generate any results in the same time frame, I will shut them down, as it is proven to be not profitable or not working.
Note: You want to increase your budget slowly, maximum 15% per day. If you go more than this, the algorithm will help to reach people who cost you a lot more and won’t convert that well.
Mistakes that you should avoid
1. Checking your Facebook campaign every hour
Running ads online is all about making informed decisions based on the data you collected. The larger sample size you test, the more accurate the results will be.
People get excited easily when they see the first lead appear in their inbox after a few hours, and start to increase the budget.
We almost made the beginner’s mistake when we had just launched the campaign. We got very excited to see the results and numbers turn positive.
Here is why: let’s use this smiley face as the representation of 10 people that saw your ads. There was one out of 10 people converted in the first hour you ran your ads. You thought that was a good one because you got a 10% conversion rate.

But look at the bigger picture when you run the ads for long enough. It might be just 1 out 100 people that become a lead for you because the next 90 people that see your ads might not become a lead or be interested in your offering.
As a professional digital marketer, I set some rules for myself to prevent me doing that. Usually I won’t make any decision until 24 – 36 hours later.
Turns out this is the right thing to do because some campaigns that get good result initially turn out to be very expensive later.
2. Combine multiple campaign custom conversion pixel data
When I first got started, we were targeting a specific group of people. After that we tried to target another group of people because the insurance company actually stopped the insurance plan 2 weeks after we launched the campaign.
Then we used the same tracking data, trying to optimize the campaign. I thought that it would be the same because it was the same group of people who wanted to buy insurance.
But I forget that the group of people we targeted was completely different compared to the second campaign we were trying to run.
The cost to acquire each lead just skyrocketed, and it was so much harder for the agent to close the deal.
Here is why.
When you create a new Facebook ad, the platform will ask you how to optimize for the conversion.

This option allows you to collect data and send feedback to Facebook’s algorithm, and tell it to find more people like the one who just converted / become your lead.
Facebook is very good at doing this.
But if you have 2 different niche / target groups that go to the same custom conversion pixel, Facebook is confused with the data you send back.
Create a separate custom conversion if you are targeting a different buyer persona.


![[Case Study] How to attract 1.53x more student inquiries in under 17 days](https://webhero.com.my/wp-content/uploads/Attract-1.53x-more-students.webp)
![[Case Study] How I Help To Enroll 114 students in 30 Days](https://webhero.com.my/wp-content/uploads/114Students.webp)